I wanted a music player with the following features:
- Inexpensive (less than $40)
- Low power (1 watt)
- Plugs in to a audio system (no batteries, not a portable player)
- Runs 24/7
- Automatically starts playing again after losing power
- Expandable storage
- Web interface
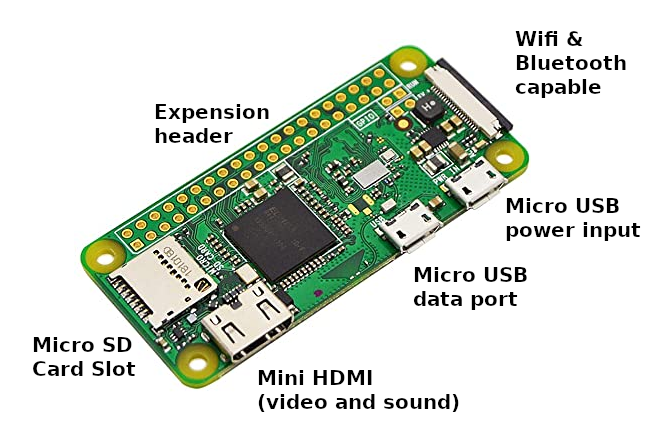
I built it on a Raspberry Pi Zero W. It is a full computer that is only 2 inches long
Here is the parts list linked to Amazon with my affilite code:
Required parts
- $27 Raspberry Pi Zero W kit with case, power cord, and adapter cables
- $10 Micro SD Card - I chose a 64GB card
The Raspberry Pi Zero W can output HDMI sound, USB sound, or Bluetooth sound without any additional components. For analog sound output, additional components are needed.
Optional parts
- USB audio jack for analog sound output. These tend have horrible sound quality in my experience, but they are very convenient.
- Pi Hat Sound Card with analog outputs. Has high quality analog sound outputs but it requires you to solder pins onto the Raspberry Pi.
Tools
- Desktop or laptop computer with a SD card reader for installing the OS on the SD card.
- HDMI Monitor needed for the setup process. When completed, the music player will run headless.
- USB Keyboard for setup. Since the Pi Zero W only has one USB port, you need a keyboard that has a USB port so that you can plug the mouse into the keyboard.
- USB Mouse for setup.
- Soldering Iron only if you are attaching the sound card.
Installing the Operating System
The music player will run Pi OS with desktop. It is a Linux operating system based on the Debian Distribution.
- Insert the SD card into your computer's card reader
- Use the Raspberry Pi Imager to download Raspberry Pi OS with desktop and put it on the SD card
- Remove the SD card from your computer and put it in the Pi Zero W.
- Connect the monitor, keyboard, mouse, and power to the Pi Zero W.
- Follow the on-screen instructions for installing the OS, setting a password, and connecting to WiFi
Set Up Networking
- Chang the host name from "raspberrypi": Open the main menu, then "Preferences", then "Raspberry Pi Configuration". Look in the "System" tab and change the host name to "music" (or choose your own creative host name for your device.)
- Enable SSH: From the "Interfaces" tab, enable SSH. Enabling SSH is useful for administration once you disconnect the monitor. It is also a good way to get your music library onto the device with scp or rsync.
- Reboot the Pi
With any luck, your device is on your local network with the "music" hostname. Test it out by connecting to it via SSH from your desktop computer
ssh pi@musicIf that doesn't work try pinning the IP address to the MAC address on your router. On mine, I log into my router, view the device list, and select "static" to keep the same IP address for that MAC address going forward. (Every router is different though)
Installing Music Player Software
It will run Music Player Daemon (mpd) with ympd web GUI for the front end. mpd is a music player service that runs on startup. It has a large number of front ends for controlling the music playing and playlist queue.
Installing MDP
sudo apt-get install mpd mpc ncmpc
sudo service mpd start
Installing YMPD
It is best to install YMPD from source to get the latest version.
sudo apt-get install cmake libmpdclient2 libmpdclient-dev libssl-dev
git clone https://github.com/notandy/ympd
cd ympd
mkdir -p build
cd build
cmake .. -DCMAKE_INSTALL_PREFIX:PATH=/usr
make
sudo make install
To run it as a service run sudo nano /etc/systemd/system/ympd.service and put in the following contents:
[Unit]
Description=Music Player Web Cliend (ympd)
After=network.target
StartLimitIntervalSec=0

[Service]
Type=simple
Restart=always
RestartSec=1
User=mpd
ExecStart=/usr/local/bin/ympd --webport 1080

[Install]
WantedBy=multi-user.target
Then run
sudo systemctl enable ympd.service
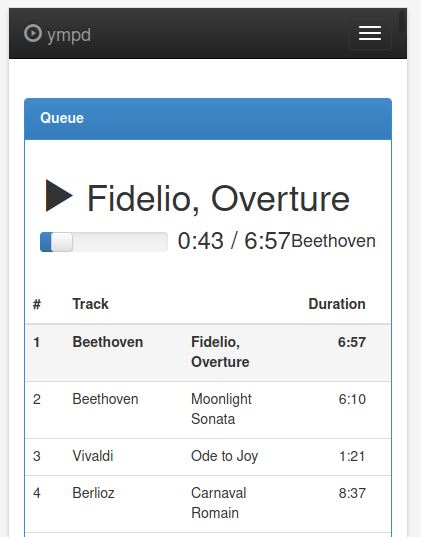
sudo service ympd startYour music player should be running at
http://music:1080/Adding your music
mpd expects to find your music library in /var/lib/mpd/music/. Start my making that directory readable and writable by all users of the system.
sudo chmod a+rw -R /var/lib/mpd/musicI used rsync to transfer all my music to that directory from my desktop system:
rsync -varh music/ pi@music:/var/lib/mpd/musicAfter adding the music, you will need to rebuild the mpd library. That can be done from the settings menu in the YMPD web interface or with the command line:
sudo mpc updateConfiguring sound output
You need to configure the sound output on the Raspberry Pi Zero W.
HDMI Sound Output
If you are planning to use HDMI sound output, congratulations, it just works. HDMI is the default sound output.
USB Sound Output
USB sound output works as soon as you disable HDMI sound output.
sudo nano /boot/config.txtComment out this line by adding the # before dtparam
# Enable audio (loads snd_bcm2835)
#dtparam=audio=on
After you reboot, USB sound will be working
Bluetooth Sound Output
I haven't tried it. It is doable, but a pain. See Bluetooth Pairing Headless Pi Zero W - Raspberry Pi Forums
Soundcard Output
After soldering the sound card header and connecting it, the manufacter of the sound card has installation instructions: AUDIO+ installation guide - Installation guides - Raspiaudio. You just need to run a script they provide. It worked perfectly for me.
Apache for SSL
I didn't run YMPD on port 80 because I wanted Apache in front of it to redirect HTTP to HTTPS and handle the security certificates. I have letsencrypt certificates for *.example.com so it I can run it with HTTPS. If you don't have your own certificates, you should skip this step.
sudo apt install apache2
sudo a2enmod alias headers proxy proxy_http proxy_wstunnel rewrite ssl
Then sudo nano /etc/apache2/sites-available/musicplayer.conf with the contents:
    Servername music.example.com
    ServerAlias music.local
    ServerAlias music
    Redirect / https://music.example.com/


    Servername music.example.com
    ServerAlias music.local
    ServerAlias music

    SSLEngine on
    SSLProtocol all -SSLv2 -SSLv3
    SSLCipherSuite ALL:!DH:!EXPORT:!RC4:+HIGH:+MEDIUM:!LOW:!aNULL:!eNULL
    SSLCertificateFile /etc/letsencrypt/live/example.com/fullchain.pem
    SSLCertificateKeyFile /etc/letsencrypt/live/example.com/privkey.pem

    RewriteEngine on
    RewriteCond %{HTTP:Upgrade} websocket [NC]
    RewriteRule /(.*) ws://localhost:1080/$1 [P,L]
    RewriteRule /(.*) http://localhost:1080/$1 [P,L]
Then enable the new configuration and restart Apache
sudo a2ensite musicplayer
sudo service apache2 restart